
MOLT Fetch moves data from a source database into CockroachDB as part of a database migration. You can use MOLT Fetch to migrate data from a PostgreSQL, MySQL, or Oracle source database.
MOLT Fetch uses IMPORT INTO or COPY FROM to move the source data to cloud storage (Google Cloud Storage, Amazon S3, or Azure Blob Storage), a local file server, or local memory. Once the data is exported, MOLT Fetch loads the data into a target CockroachDB database.
Prerequisites
Supported databases
The following source databases are supported:
- PostgreSQL 11-16
- MySQL 5.7-8.4
- Oracle Database 19c (Enterprise Edition) and 21c (Express Edition)
Database configuration
Ensure that the source and target schemas are identical, unless you enable automatic schema creation with the drop-on-target-and-recreate option. If you are creating the target schema manually, review the behaviors in Mismatch handling.
MOLT Fetch does not support migrating sequences. If your source database contains sequences, refer to the guidance on indexing with sequential keys. If a sequential key is necessary in your CockroachDB table, you must create it manually. After using MOLT Fetch to load the data onto the target, but before cutover, make sure to update each sequence's current value using setval() so that new inserts continue from the correct point.
If you plan to use cloud storage for the data migration, follow Cloud storage security best practices.
User permissions
The SQL user running MOLT Fetch requires specific privileges on both the source and target databases:
| Database | Required Privileges | Examples |
|---|---|---|
| PostgreSQL source |
|
Create PostgreSQL migration user |
| MySQL source |
|
Create MySQL migration user |
| Oracle source |
|
Create Oracle migration user |
| CockroachDB target |
|
Create CockroachDB user |
How it works
MOLT Fetch operates in two distinct phases to move data from the source databases to CockroachDB. The data export phase moves data to intermediate storage (either cloud storage or a local file server). The data import phase moves data from that intermediate storage to the CockroachDB cluster. For details on available modes, refer to Define fetch mode.
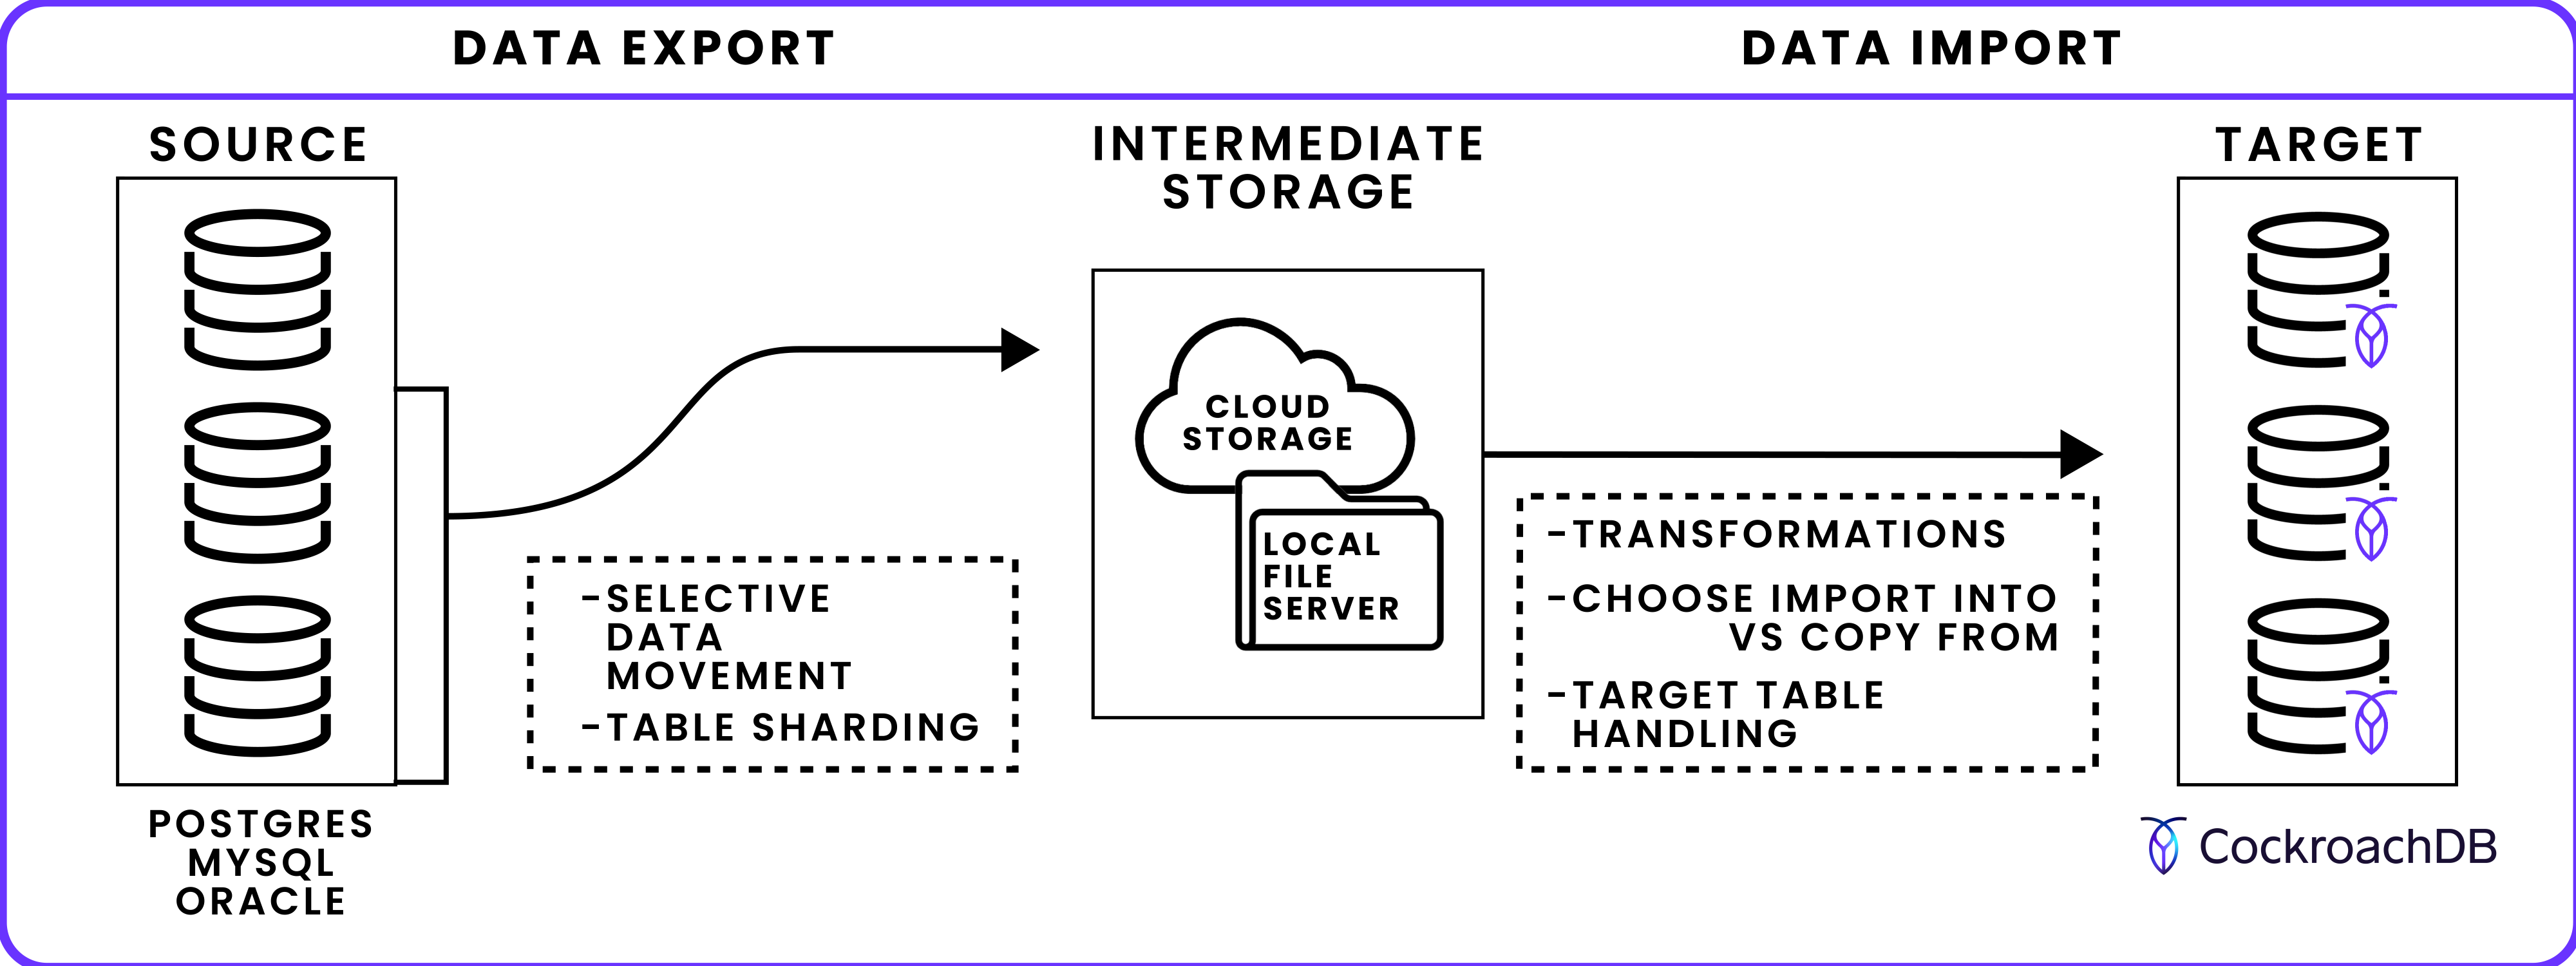
Data export phase
In this first phase, MOLT Fetch connects to the source database and exports table data to intermediate storage.
Selective data movement: By default, MOLT Fetch moves all data from the --source database to CockroachDB. If instead you want to move a subset of the available data, use the
--schema-filter,--table-filter, and--filter-pathflags.Table sharding for concurrent export: Multiple tables and table shards can be exported simultaneously using
--table-concurrencyand--export-concurrency, with large tables divided into shards for parallel processing.Load into intermediate storage: Define whether data is written to cloud storage (Amazon S3, Google Cloud Storage, Azure Blob Storage), a local file server, or directly to CockroachDB memory. Intermediate storage enables continuation after a MOLT Fetch failure by storing continuation tokens.
Data import phase
MOLT Fetch loads the exported data from intermediate storage to the target CockroachDB database.
IMPORT INTOvs.COPY FROM: This phase usesIMPORT INTO(faster, tables offline during import) orCOPY FROM(slower, tables remain queryable) to move data.Target table handling: Target tables can be automatically created, truncated, or left unchanged based on
--table-handlingsettings.Schema/table transformations: Use JSON to map computed columns from source to target, map partitioned tables to a single target table, rename tables on the target database, or rename database schemas.
Refer to the MOLT Fetch flags to learn how to use any flag for the molt fetch command.
Run MOLT Fetch
The following section describes how to use the molt fetch command and how to set its main flags.
Specify source and target databases
Follow the recommendations in Connection security.
--source specifies the connection string of the source database.
PostgreSQL or CockroachDB connection string:
--source 'postgresql://{username}:{password}@{host}:{port}/{database}'
MySQL connection string:
--source 'mysql://{username}:{password}@{protocol}({host}:{port})/{database}'
Oracle connection string:
--source 'oracle://{username}:{password}@{host}:{port}/{service_name}'
For Oracle Multitenant databases, --source-cdb specifies the container database (CDB) connection. --source specifies the pluggable database (PDB):
--source 'oracle://{username}:{password}@{host}:{port}/{pdb_service_name}'
--source-cdb 'oracle://{username}:{password}@{host}:{port}/{cdb_service_name}'
--target specifies the CockroachDB connection string:
--target 'postgresql://{username}:{password}@{host}:{port}/{database}'
Define fetch mode
--mode specifies the MOLT Fetch behavior.
data-load (default) instructs MOLT Fetch to load the source data into CockroachDB:
--mode data-load
export-only instructs MOLT Fetch to export the source data to the specified cloud storage or local file server. It does not load the data into CockroachDB:
--mode export-only
import-only instructs MOLT Fetch to load the source data in the specified cloud storage or local file server into the CockroachDB target:
--mode import-only
Select data to migrate
By default, MOLT Fetch moves all data from the --source database to CockroachDB. Use the following flags to move a subset of data.
Schema and table selection
--schema-filter specifies a range of schema objects to move to CockroachDB, formatted as a POSIX regex string. For example, to move every table in the source database's migration_schema schema:
--schema-filter 'migration_schema'
--schema-filter does not apply to MySQL sources because MySQL tables belong directly to the database specified in the connection string, not to a separate schema.
--table-filter and --table-exclusion-filter specify tables to include and exclude from the migration, respectively, formatted as POSIX regex strings. For example, to move every source table that has "user" in the table name and exclude every source table that has "temp" in the table name:
--table-filter '.*user.*' --table-exclusion-filter '.*temp.*'
To filter tables during replication, use MOLT Replicator with userscripts.
Row-level filtering
Use --filter-path to specify the path to a JSON file that defines row-level filtering for data load. This enables you to move a subset of data in a table, rather than all data in the table. To apply row-level filters during replication, use MOLT Replicator with userscripts.
--filter-path 'data-filter.json'
The JSON file should contain one or more entries in filters, each with a resource_specifier (schema and table) and a SQL expression expr. For example, the following example exports only rows from migration_schema.t1 where v > 100:
{
  "filters": [
    {
      "resource_specifier": {
        "schema": "migration_schema",
        "table": "t1"
      },
      "expr": "v > 100"
    }
  ]
}
expr is case-sensitive and must be valid in your source dialect. For example, when using Oracle as the source, quote all identifiers and escape embedded quotes:
{
  "filters": [
    {
      "resource_specifier": {
        "schema": "C##FETCHORACLEFILTERTEST",
        "table": "FILTERTBL"
      },
      "expr": "ABS(\"X\") > 10 AND CEIL(\"X\") < 100 AND FLOOR(\"X\") > 0 AND ROUND(\"X\", 2) < 100.00 AND TRUNC(\"X\", 0) > 0 AND MOD(\"X\", 2) = 0 AND FLOOR(\"X\" / 3) > 1"
    }
  ]
}
If the expression references columns that are not indexed, MOLT Fetch will emit a warning like: filter expression 'v > 100' contains column 'v' which is not indexed. This may lead to performance issues.
Shard tables for concurrent export
During the data export phase, MOLT Fetch can divide large tables into multiple shards for concurrent export.
To control the number of shards created per table, use the --export-concurrency flag. For example:
--export-concurrency=4
For performance considerations with concurrency settings, refer to Best practices.
Two sharding mechanisms are available:
Range-based sharding (default): Tables are divided based on numerical ranges found in primary key values. Only tables with
INT,FLOAT, orUUIDprimary keys can use range-based sharding. Tables with other primary key data types export as a single shard.Stats-based sharding (PostgreSQL only): Enable with
--use-stats-based-shardingfor PostgreSQL 11+ sources. Tables are divided by analyzing thepg_statsview to create more evenly distributed shards, up to a maximum of 200 shards. Primary keys of any data type are supported.
Stats-based sharding requires that the user has SELECT permissions on source tables and on each table's pg_stats view. The latter permission is automatically granted to users that can read the table.
To optimize stats-based sharding, run ANALYZE on source tables before migration to ensure that table statistics are up-to-date and shards are evenly distributed. This requires MAINTAIN or OWNER permissions on the table. You can analyze specific primary key columns or the entire table. For example:
ANALYZE table_name(PK1, PK2, PK3);
ANALYZE table_name;
Large tables may take time to analyze, but ANALYZE can run in the background. You can run ANALYZE with MAINTAIN or OWNER privileges during migration preparation, then perform the actual migration with standard SELECT privileges.
Migration without running ANALYZE will still work, but shard distribution may be less even.
When using --use-stats-based-sharding, monitor the log output for each table you want to migrate.
If stats-based sharding is successful on a table, MOLT logs the following INFO message:
Stats based sharding enabled for table {table_name}
If stats-based sharding fails on a table, MOLT logs the following WARNING message and defaults to range-based sharding:
Warning: failed to shard table {table_name} using stats based sharding: {reason_for_failure}, falling back to non stats based sharding
The number of shards is dependent on the number of distinct values in the first primary key column of the table to be migrated. If this is different from the number of shards requested with --export-concurrency, MOLT logs the following WARNING and continues with the migration:
number of shards formed: {num_shards_formed} is not equal to number of shards requested: {num_shards_requested} for table {table_name}
Because stats-based sharding analyzes the entire table, running --use-stats-based-sharding with --filter-path (refer to Selective data movement) will cause imbalanced shards to form.
Define intermediate storage
MOLT Fetch can move the source data to CockroachDB via cloud storage, a local file server, or directly without an intermediate store.
Bucket path
Only the path specified in --bucket-path is used. Query parameters, such as credentials, are ignored. To authenticate cloud storage, follow the steps in Secure cloud storage.
--bucket-path instructs MOLT Fetch to write intermediate files to a path within Google Cloud Storage, Amazon S3, or Azure Blob Storage to which you have the necessary permissions. Use additional flags, shown in the following examples, to specify authentication or region parameters as required for bucket access.
Connect to a Google Cloud Storage bucket with implicit authentication and assume role:
--bucket-path 'gs://migration/data/cockroach'
--assume-role 'user-test@cluster-ephemeral.iam.gserviceaccount.com'
--use-implicit-auth
Connect to an Amazon S3 bucket and explicitly specify the ap_south-1 region:
--bucket-path 's3://migration/data/cockroach'
--import-region 'ap-south-1'
When --import-region is set, IMPORT INTO must be used for data movement.
Connect to an Azure Blob Storage container with implicit authentication:
--bucket-path 'azure-blob://migration/data/cockroach'
--use-implicit-auth
Local path
--local-path instructs MOLT Fetch to write intermediate files to a path within a local file server. --local-path-listen-addr specifies the address of the local file server. For example:
--local-path /migration/data/cockroach
--local-path-listen-addr 'localhost:3000'
In some cases, CockroachDB will not be able to use the local address specified by --local-path-listen-addr. This will depend on where CockroachDB is deployed, the runtime OS, and the source dialect.
For example, if you are migrating to CockroachDB Cloud, such that the Cloud cluster is in a different physical location than the machine running molt fetch, then CockroachDB cannot reach an address such as localhost:3000. In these situations, use --local-path-crdb-access-addr to specify an address for the local file server that is publicly accessible. For example:
--local-path /migration/data/cockroach
--local-path-listen-addr 'localhost:3000'
--local-path-crdb-access-addr '44.55.66.77:3000'
Cloud storage is often preferable to a local file server, which can require considerable disk space.
Direct copy
--direct-copy specifies that MOLT Fetch should use COPY FROM to move the source data directly to CockroachDB without an intermediate store:
- Direct copy does not support compression or continuation.
- The
--use-copyflag is redundant with--direct-copy.
IMPORT INTO vs. COPY FROM
MOLT Fetch can use either IMPORT INTO or COPY FROM to load data into CockroachDB.
By default, MOLT Fetch uses IMPORT INTO:
IMPORT INTOachieves the highest throughput, but requires taking the CockroachDB tables offline to achieve its import speed. Tables are taken back online once an import job completes successfully. See Best practices.IMPORT INTOsupports compression using the--compressionflag, which reduces the amount of storage used.
--use-copy configures MOLT Fetch to use COPY FROM:
COPY FROMenables your tables to remain online and accessible. However, it is slower than usingIMPORT INTO.COPY FROMdoes not support compression.
COPY FROM is also used for direct copy.
Handle target tables
--table-handling defines how MOLT Fetch loads data on the CockroachDB tables that match the selection.
To load the data without changing the existing data in the tables, use none:
--table-handling none
To truncate tables before loading the data, use truncate-if-exists:
--table-handling truncate-if-exists
To drop existing tables and create new tables before loading the data, use drop-on-target-and-recreate:
--table-handling drop-on-target-and-recreate
When using the drop-on-target-and-recreate option, MOLT Fetch creates a new CockroachDB table to load the source data if one does not already exist. To guide the automatic schema creation, you can explicitly map source types to CockroachDB types. drop-on-target-and-recreate does not create indexes or constraints other than PRIMARY KEY and NOT NULL.
Mismatch handling
If either none or truncate-if-exists is set, molt fetch loads data into the existing tables on the target CockroachDB database. If the target schema mismatches the source schema, molt fetch will exit early in certain cases, and will need to be re-run from the beginning. For details, refer to Fetch exits early due to mismatches.
This does not apply when drop-on-target-and-recreate is specified, since this option automatically creates a compatible CockroachDB schema.
Skip primary key matching
--skip-pk-check removes the requirement that source and target tables share matching primary keys for data load. When this flag is set:
- The data load proceeds even if the source or target table lacks a primary key, or if their primary key columns do not match.
- Table sharding is disabled. Each table is exported in a single batch within one shard, bypassing
--export-concurrencyand--row-batch-size. As a result, memory usage and execution time may increase due to full table scans. - If the source table contains duplicate rows but the target has
PRIMARY KEYorUNIQUEconstraints, duplicate rows are deduplicated during import.
When --skip-pk-check is set, all tables are treated as if they lack a primary key, and are thus exported in a single unsharded batch. To avoid performance issues, use this flag with --table-filter to target only tables without a primary key.
For example:
molt fetch \
  --mode data-load \
  --table-filter 'nopktbl' \
  --skip-pk-check
Example log output when --skip-pk-check is enabled:
{"level":"info","message":"sharding is skipped for table public.nopktbl - flag skip-pk-check is specified and thus no PK for source table is specified"}
Type mapping
If drop-on-target-and-recreate is set, MOLT Fetch automatically creates a CockroachDB schema that is compatible with the source data. The column types are determined as follows:
- PostgreSQL types are mapped to existing CockroachDB types that have the same
OID. The following MySQL types are mapped to corresponding CockroachDB types:
MySQL type CockroachDB type Notes CHAR,CHARACTER,VARCHAR,NCHAR,NVARCHARVARCHARVarying-length string; raises warning if BYTE semantics used TINYTEXT,TEXT,MEDIUMTEXT,LONGTEXTSTRINGUnlimited-length string GEOMETRYGEOMETRYSpatial type (PostGIS-style) LINESTRINGLINESTRINGSpatial type (PostGIS-style) POINTPOINTSpatial type (PostGIS-style) POLYGONPOLYGONSpatial type (PostGIS-style) MULTIPOINTMULTIPOINTSpatial type (PostGIS-style) MULTILINESTRINGMULTILINESTRINGSpatial type (PostGIS-style) MULTIPOLYGONMULTIPOLYGONSpatial type (PostGIS-style) GEOMETRYCOLLECTION,GEOMCOLLECTIONGEOMETRYCOLLECTIONSpatial type (PostGIS-style) JSONJSONBCRDB's native JSON format TINYINT,INT1INT22-byte integer BLOBBYTESBinary data SMALLINT,INT2INT22-byte integer MEDIUMINT,INT,INTEGER,INT4INT44-byte integer BIGINT,INT8INT8-byte integer FLOATFLOAT432-bit float DOUBLEFLOAT64-bit float DECIMAL,NUMERIC,REALDECIMALValidates scale ≤ precision; warns if precision > 19 BINARY,VARBINARYBYTESBinary data DATETIMETIMESTAMPDate and time (no time zone) TIMESTAMPTIMESTAMPTZDate and time with time zone TIMETIMETime of day (no date) BITVARBITVariable-length bit array DATEDATEDate only (no time) TINYBLOB,MEDIUMBLOB,LONGBLOBBYTESBinary data BOOL,BOOLEANBOOLBoolean The following Oracle types are mapped to CockroachDB types:
Oracle type(s) CockroachDB type Notes NCHAR,CHAR,CHARACTERCHAR(n) orCHARFixed-length character; falls back to unbounded if length not specified VARCHAR,VARCHAR2,NVARCHAR2VARCHAR(n) orVARCHARVarying-length string; raises warning if BYTE semantics used STRINGSTRINGUnlimited-length string SMALLINTINT22-byte integer INTEGER,INT,SIMPLE_INTEGERINT44-byte integer LONGINT88-byte integer FLOAT,BINARY_FLOAT,REALFLOAT432-bit float DOUBLE,BINARY_DOUBLEFLOAT864-bit float DEC,NUMBER,DECIMAL,NUMERICDECIMAL(p, s) orDECIMALValidates scale ≤ precision; warns if precision > 19 DATEDATEDate only (no time) BLOB,RAW,LONG RAWBYTESBinary data JSONJSONBCRDB's native JSON format CLOB,NCLOBSTRINGTreated as large text BOOLEANBOOLBoolean TIMESTAMPTIMESTAMPorTIMESTAMPTZIf WITH TIME ZONE→TIMESTAMPTZ, elseTIMESTAMPROWID,UROWIDSTRINGTreated as opaque identifier SDO_GEOMETRYGEOMETRYSpatial type (PostGIS-style) XMLTYPESTRINGStored as text To override the default mappings for automatic schema creation, you can map source to target CockroachDB types explicitly. These are defined in the JSON file indicated by the
--type-map-fileflag. The allowable custom mappings are valid CockroachDB aliases, casts, and the following mappings specific to MOLT Fetch and Verify:
--type-map-file specifies the path to the JSON file containing the explicit type mappings. For example:
--type-map-file 'type-mappings.json'
The following JSON example defines two type mappings:
 [
  {
    "table": "public.t1",
    "column_type_map": [
      {
        "column": "*",
        "source_type": "int",
        "crdb_type": "INT2"
      },
      {
        "column": "name",
        "source_type": "varbit",
        "crdb_type": "string"
      }
    ]
  }
]
tablespecifies the table that will use the custom type mappings incolumn_type_map. The value is written as{schema}.{table}.columnspecifies the column that will use the custom type mapping. If*is specified, then all columns in thetablewith the matchingsource_typeare converted.source_typespecifies the source type to be mapped.crdb_typespecifies the target CockroachDB type to be mapped.
Define transformations
You can define transformation rules to be performed on the target database during the fetch task. These can be used to:
- Map computed columns from source to target.
- Map partitioned tables to a single target table.
- Rename tables on the target database.
- Rename database schemas.
Transformation rules are defined in the JSON file indicated by the --transformations-file flag. For example:
--transformations-file 'transformation-rules.json'
Transformation rules example
The following JSON example defines three transformation rules: rule 1 maps computed columns, rule 2 renames tables, and rule 3 renames schemas.
{
  "transforms": [
    {
      "id": 1,
      "resource_specifier": {
        "schema": ".*",
        "table": ".*"
      },
      "column_exclusion_opts": {
        "add_computed_def": true,
        "column": "^age$"
      }
    },
    {
      "id": 2,
      "resource_specifier": {
        "schema": "public",
        "table": "charges_part.*"
      },
      "table_rename_opts": {
        "value": "charges"
      }
    },
    {
      "id": 3,
      "resource_specifier": {
        "schema": "previous_schema"
      },
      "schema_rename_opts": {
        "value": "new_schema"
      }
    }
  ]
}
Column exclusions and computed columns
resource_specifier: Identifies which schemas and tables to transform.schema: POSIX regex matching source schemas.table: POSIX regex matching source tables.
column_exclusion_opts: Exclude columns or map them as computed columns.column: POSIX regex matching source columns to exclude.add_computed_def: Whentrue, map matching columns as computed columns on target tables usingALTER TABLE ... ADD COLUMNand the source column definition. All matching columns must be computed columns on the source.Warning:Columns matchingcolumnare not moved to CockroachDB ifadd_computed_defisfalse(default) or if matching columns are not computed columns.
Example rule 1 maps all source age columns to computed columns on CockroachDB. This assumes that all matching age columns are defined as computed columns on the source:
{
  "id": 1,
  "resource_specifier": {
    "schema": ".*",
    "table": ".*"
  },
  "column_exclusion_opts": {
    "add_computed_def": true,
    "column": "^age$"
  }
},
Table renaming
resource_specifier: Identifies which schemas and tables to transform.schema: POSIX regex matching source schemas.table: POSIX regex matching source tables.
table_rename_opts: Rename tables on the target.value: Target table name. For a single matching source table, renames it to this value. For multiple matches (n-to-1), consolidates matching partitioned tables with the same table definition into a single table with this name.For n-to-1 mappings:
- Use
--use-copyor--direct-copyfor data movement. - Manually create the target table. Do not use
--table-handling drop-on-target-and-recreate.
- Use
Example rule 2 maps all table names with prefix charges_part to a single charges table on CockroachDB (an n-to-1 mapping). This assumes that all matching charges_part.* tables have the same table definition:
{
  "id": 2,
  "resource_specifier": {
    "schema": "public",
    "table": "charges_part.*"
  },
  "table_rename_opts": {
    "value": "charges"
  }
},
Schema renaming
resource_specifier: Identifies which schemas and tables to transform.schema: POSIX regex matching source schemas.table: POSIX regex matching source tables.
schema_rename_opts: Rename database schemas on the target.value: Target schema name. For example,previous_schema.table1becomesnew_schema.table1.
Example rule 3 renames the database schema previous_schema to new_schema on CockroachDB:
{
  "id": 3,
  "resource_specifier": {
    "schema": "previous_schema"
  },
  "schema_rename_opts": {
    "value": "new_schema"
  }
}
General notes
Each rule is applied in the order it is defined. If two rules overlap, the later rule will override the earlier rule.
To verify that the logging shows that the computed columns are being created:
When running molt fetch, set --logging debug and look for ALTER TABLE ... ADD COLUMN statements with the STORED or VIRTUAL keywords in the log output:
{"level":"debug","time":"2024-07-22T12:01:51-04:00","message":"running: ALTER TABLE IF EXISTS public.computed ADD COLUMN computed_col INT8 NOT NULL AS ((col1 + col2)) STORED"}
After running molt fetch, issue a SHOW CREATE TABLE statement on CockroachDB:
SHOW CREATE TABLE computed;
  table_name |                         create_statement
-------------+-------------------------------------------------------------------
  computed   | CREATE TABLE public.computed (
  ...
             |     computed_col INT8 NOT NULL AS (col1 + col2) STORED
             | )
Continue MOLT Fetch after interruption
If MOLT Fetch fails while loading data into CockroachDB from intermediate files, it exits with an error message, fetch ID, and continuation token for each table that failed to load on the target database. You can use this information to continue the task from the continuation point where it was interrupted.
Continuation is only possible under the following conditions:
- All data has been exported from the source database into intermediate files on cloud or local storage.
- The initial load of source data into the target CockroachDB database is incomplete.
Only one fetch ID and set of continuation tokens, each token corresponding to a table, are active at any time. See List active continuation tokens.
To retry all data starting from the continuation point, reissue the molt fetch command and include the --fetch-id.
--fetch-id d44762e5-6f70-43f8-8e15-58b4de10a007
To retry a specific table that failed, include both --fetch-id and --continuation-token. The latter flag specifies a token string that corresponds to a specific table on the source database. A continuation token is written in the molt fetch output for each failed table. If the fetch task encounters a subsequent error, it generates a new token for each failed table. See List active continuation tokens.
This will retry only the table that corresponds to the continuation token. If the fetch task succeeds, there may still be source data that is not yet loaded into CockroachDB.
--fetch-id d44762e5-6f70-43f8-8e15-58b4de10a007
--continuation-token 011762e5-6f70-43f8-8e15-58b4de10a007
To retry all data starting from a specific file, include both --fetch-id and --continuation-file-name. The latter flag specifies the filename of an intermediate file in cloud or local storage. All filenames are prepended with part_ and have the .csv.gz or .csv extension, depending on compression type (gzip by default). For example:
--fetch-id d44762e5-6f70-43f8-8e15-58b4de10a007
--continuation-file-name part_00000003.csv.gz
Continuation is not possible when using direct copy.
List active continuation tokens
To view all active continuation tokens, issue a molt fetch tokens list command along with --conn-string, which specifies the connection string for the target CockroachDB database. For example:
molt fetch tokens list \
--conn-string 'postgres://root@localhost:26257/defaultdb?sslmode=verify-full'
+--------------------------------------+--------------------------------------+------------------+----------------------+
|                  ID                  |               FETCH ID               |    TABLE NAME    |      FILE NAME       |
+--------------------------------------+--------------------------------------+------------------+----------------------+
| f6f0284c-d9c1-43c9-8fde-af609d0dbd82 | 66443597-5689-4df3-a7b9-9fc5e27180eb | public.employees | part_00000001.csv.gz |
+--------------------------------------+--------------------------------------+------------------+----------------------+
Continuation Tokens.
Enable replication
A change data capture (CDC) cursor is written to the MOLT Fetch output as cdc_cursor at the beginning and end of the fetch task.
For MySQL:
{"level":"info","type":"summary","fetch_id":"735a4fe0-c478-4de7-a342-cfa9738783dc","num_tables":1,"tables":["public.employees"],"cdc_cursor":"b7f9e0fa-2753-1e1f-5d9b-2402ac810003:3-21","net_duration_ms":4879.890041,"net_duration":"000h 00m 04s","time":"2024-03-18T12:37:02-04:00","message":"fetch complete"}
For Oracle:
{"level":"info","type":"summary","fetch_id":"735a4fe0-c478-4de7-a342-cfa9738783dc","num_tables":3,"tables":["migration_schema.employees"],"cdc_cursor":"backfillFromSCN=26685444,scn=26685786","net_duration_ms":6752.847625,"net_duration":"000h 00m 06s","time":"2024-03-18T12:37:02-04:00","message":"fetch complete"}
This cdc_cursor value is also included in the output of a fetch task from a PostgreSQL source. However, in the case of a PostgreSQL source, you can instead enable replication with the --pglogical-replication-slot-name and --pglogical-publication-and-slot-drop-and-recreate flags, which must be defined.
Use the cdc_cursor value as the checkpoint for MySQL or Oracle replication with MOLT Replicator. Use the --pglogical-replication-slot-name value as the checkpoint for PostgreSQL replication with MOLT Replicator. Refer to Replication checkpoints in the MOLT Replicator documentation.
You can also use the cdc_cursor value with an external change data capture (CDC) tool to continuously replicate subsequent changes from the source database to CockroachDB.
Docker usage
Authentication
When using MOLT Fetch with cloud storage, it is necessary to specify volumes and environment variables, as described in the following sections for Google Cloud Storage and Amazon S3.
No additional configuration is needed when running MOLT Fetch with a local file server or in direct copy mode:
docker run -it cockroachdb/molt fetch ...
For more information on docker run, see the Docker documentation.
Google Cloud Storage
If you are using Google Cloud Storage for cloud storage:
Volume map the application_default_credentials.json file into the container, and set the GOOGLE_APPLICATION_CREDENTIALS environment variable to point to this file.
docker run \
  -v ~/.config/gcloud/application_default_credentials.json:/gcp/creds.json:ro \
  -e GOOGLE_APPLICATION_CREDENTIALS=/gcp/creds.json \
  -it \
  cockroachdb/molt fetch ...
In case the previous authentication method fails, you can volume map the entire Google Cloud configuration directory into the container. In addition to setting the GOOGLE_APPLICATION_CREDENTIALS environment variable, set CLOUDSDK_CONFIG to point to the configuration directory:
docker run \
  -v ~/.config/gcloud:/gcp/config:ro \
  -e CLOUDSDK_CONFIG=/gcp/config \
  -e GOOGLE_APPLICATION_CREDENTIALS=/gcp/config/application_default_credentials.json \
  -it \
  cockroachdb/molt fetch ...
For details on Google Cloud Storage authentication, see Application Default Credentials.
Amazon S3
If you are using Amazon S3 for cloud storage:
Volume map the host's ~/.aws directory to the /root/.aws directory inside the container, and set the required AWS_REGION, AWS_SECRET_ACCESS_KEY, and AWS_ACCESS_KEY_ID environment variables:
docker run \
  -v ~/.aws:/root/.aws \
  -e AWS_REGION=your-region \
  -e AWS_SECRET_ACCESS_KEY=your-secret-access-key \
  -e AWS_ACCESS_KEY_ID=your-access-key-id \
  -it \
  cockroachdb/molt fetch ...
Local connection strings
When testing locally, specify the host as follows:
For macOS, use
host.docker.internal. For example:--source 'postgres://postgres:postgres@host.docker.internal:5432/migration_db?sslmode=disable' --target "postgres://root@host.docker.internal:26257/defaultdb?sslmode=disable"For Linux and Windows, use
172.17.0.1. For example:--source 'postgres://postgres:postgres@172.17.0.1:5432/migration_db?sslmode=disable' --target "postgres://root@172.17.0.1:26257/defaultdb?sslmode=disable"
Common uses
Bulk data load
When migrating data to CockroachDB in a bulk load (without utilizing continuous replication to minimize system downtime), run the molt fetch command with the required flags, as shown below:
Specify the source and target database connections. For connection string formats, refer to Source and target databases.
--source $SOURCE
--target $TARGET
For Oracle Multitenant (CDB/PDB) sources, also include --source-cdb to specify the container database (CDB) connection string.
--source $SOURCE
--source-cdb $SOURCE_CDB
--target $TARGET
Specify how to move data to CockroachDB. Use cloud storage for intermediate file storage:
--bucket-path 's3://bucket/path'
Alternatively, use a local file server for intermediate storage:
--local-path /migration/data/cockroach
--local-path-listen-addr 'localhost:3000'
Alternatively, use direct copy to move data directly without intermediate storage:
--direct-copy
Optionally, filter the source data to migrate. By default, all schemas and tables are migrated. For details, refer to Schema and table selection.
--schema-filter 'migration_schema'
--table-filter '.*user.*'
For Oracle sources, --schema-filter is case-insensitive. You can use either lowercase or uppercase:
--schema-filter 'migration_schema'
--table-filter '.*user.*'
For MySQL sources, omit --schema-filter because MySQL tables belong directly to the database specified in the connection string, not to a separate schema. If needed, use --table-filter to select specific tables:
--table-filter '.*user.*'
Specify how to handle target tables. By default, --table-handling is set to none, which loads data without changing existing data in the tables. For details, refer to Target table handling:
--table-handling truncate-if-exists
When performing a bulk load without subsequent replication, use --ignore-replication-check to skip querying for replication checkpoints (such as pg_current_wal_insert_lsn() on PostgreSQL, gtid_executed on MySQL, and CURRENT_SCN on Oracle). This is appropriate when:
- Performing a one-time data migration with no plan to replicate ongoing changes.
- Exporting data from a read replica where replication checkpoints are unavailable.
--ignore-replication-check
At minimum, the molt fetch command should include the source, target, data path, and --ignore-replication-check flags:
molt fetch \
--source $SOURCE \
--target $TARGET \
--bucket-path 's3://bucket/path' \
--ignore-replication-check
For detailed walkthroughs of migrations that use molt fetch in this way, refer to these common migration approaches:
Initial bulk load (before replication)
In a migration that utilizes continuous replication, perform an initial data load before setting up ongoing replication with MOLT Replicator. Run the molt fetch command without --ignore-replication-check, as shown below:
The workflow is the same as Bulk data load, except:
- Exclude
--ignore-replication-check. MOLT Fetch will query and record replication checkpoints. - After the data load completes, check the CDC cursor in the output for the checkpoint value to use with MOLT Replicator.
- You must include
--pglogical-replication-slot-nameand--pglogical-publication-and-slot-drop-and-recreateto automatically create the publication and replication slot during the data load.
At minimum, the molt fetch command should include the source, target, and data path flags:
molt fetch \
--source $SOURCE \
--target $TARGET \
--bucket-path 's3://bucket/path' \
--pglogical-replication-slot-name molt_slot \
--pglogical-publication-and-slot-drop-and-recreate
molt fetch \
--source $SOURCE \
--target $TARGET \
--bucket-path 's3://bucket/path'
molt fetch \
--source $SOURCE \
--source-cdb $SOURCE_CDB \
--target $TARGET \
--bucket-path 's3://bucket/path'
The output will include a cdc_cursor value at the end of the fetch task:
{"level":"info","type":"summary","fetch_id":"735a4fe0-c478-4de7-a342-cfa9738783dc","num_tables":1,"tables":["public.employees"],"cdc_cursor":"b7f9e0fa-2753-1e1f-5d9b-2402ac810003:3-21","net_duration_ms":4879.890041,"net_duration":"000h 00m 04s","time":"2024-03-18T12:37:02-04:00","message":"fetch complete"}
Use this cdc_cursor value when starting MOLT Replicator to ensure replication begins from the correct position.
For detailed walkthroughs of migrations that use molt fetch in this way, refer to these common migration approaches:
Known limitations
- Only tables with primary key types of
INT,FLOAT, orUUIDcan be sharded with--export-concurrency. GEOMETRYandGEOGRAPHYtypes are not supported.
The following limitation is specific to PostgreSQL sources:
OID LOBtypes in PostgreSQL are not supported, although similar types likeBYTEAare supported.
The following limitations are specific to Oracle sources:
- Migrations must be performed from a single Oracle schema. You must include
--schema-filterso that MOLT Fetch only loads data from the specified schema. Refer to Schema and table filtering.- Specifying
--table-filteris also strongly recommended to ensure that only necessary tables are migrated from the Oracle schema.
- Specifying
- Oracle advises against
LONG RAWcolumns and recommends converting them toBLOB.LONG RAWcan only store binary values up to 2GB, and only oneLONG RAWcolumn per table is supported.
